General
Troop Elections and Leadership Process
4 Week Process:
Week 1: General Info
- Announce coming elections
- Give leadership expectations to all interested Scouts for Senior Patrol Leader or Assistant Senior Patrol Leader (ASPL)
Week 2: Senior Patrol Elections (SPL chooses ASPLs)
- Scouts in other Leadership positions help other scouts understand what the job is and recognize accomplishments of those scouts
- Scouts can get job description and expectation form on any leadership position that they are interested in.
Week 3: Patrol Leader Elections (PL chooses APL)
- Remainder of boys from Leadership positions help other scouts understand their job
- All Scouts are given a “Request for Leadership Position” form which they should be filled out and given to Scoutmaster.
Week 4: Results
- Scoutmaster announces new positions and gives Uniform patches
- Leadership officially changes in all positions
General Info about Leadership Positions:
- Positions last for 6 months
- Leadership positions should be discussed at the Scoutmaster Conference and BOR for all 2nd Class Scouts.
- Scouts are responsible for meeting expectations for position
- Past performance may or may not affect his possible leadership positions
- After 3 months in position, Adult Advisor will initiate short review evaluating his performance
Adult Advisors:
Scoutmaster: SPL, ASPL, Instructors
ASM, Patrol Advisor: PL, APL, Troop Guides
Advancement Chair: Librarian
Secretary: Scribe
Quartermaster: Quartermasters
Where can i find out more about how the troop operates?
Read our handbook!
How do i get reimbursed for troop expenses
Fill in the Blank Expense form, and submit to the Troop Treasurer
Why am I not getting email messages from the troop?
Troop-wide emails are sent to the email addresses registered in Scoutbook.com (the email address you use to log in to Scoutbook). First, check to make sure the correct email address is registered in Scoutbook.
Second, your email spam filters might be blocking our email messages. To avoid this, add our address to your ‘safe senders’ list – indicating to your email program that it should not consider our emails ‘junk’.
The procedure to do this depends on the email program you use – they are all different. You should consult the help section of your email program; in most cases adding our email address to your ‘Contacts’ is enough to show that you know us and want to receive email from us. The addresses you should add to your Contacts are:
info@scoutbook.com
newsletter@bsa889.com
Here are some general instructions for popular email client:
AOL 8.0+
- Step 1 Open the email
- Step 2 Click Add Address icon
- Step 3 Verify the sender’s contact information
AOL Webmail
- Step 1 Click on the Addresses tab in the upper right corner of the Mailbox window
- Step 2 Click on the New drop-down menu and select New Contact.
- Step 3 Type the email address of the new contact in the Screen Name field and click the Save button.
Earthlink
- Step 1 Open the email
- Step 2 Click Add Sender
- Step 3 Verify that our contact information is correct
- Step 4 Click “Yes”
Entourage
- Step 1 Open the email
- Step 2 Right-click the sender’s email address
- Step 3 Select Add to Address Book in the short-cut menu
- Step 4 Verify the sender’s contact details
Gmail
- Step 1 Open the email.
- Step 2 Click on More Options in the upper right hand corner of the message.
- Step 3 Click on Add Sender to Contacts List in the header of the email.
- Step 4 A confirmation message will be displayed above the email.
Juno
- Step 1 From the mail screen, click on the Address Book tab.
- Step 2 Insert the email address you would like to add.
- Step 3 Click Quick Add
Mac Mail
- Step 1 Open the email
- Step 2 Right-click the sender’s email address
- Step 3 Click Add to contacts in the short-cut menu
- Step 4 Click Save and Close
Microsoft Outlook Express 6+
- Step 1 Open the email
- Step 2 Left-click the sender icon, or right click the sender’s name
- Step 3 Click Add to contact
- Step 4 Click Save and close
Microsoft Outlook 2003
- Step 1 Open the email
- Step 2 Select Actions on the toolbar
- Step 3 Select Junk Email from the drop-down menu
- Step 4 Select Add sender to Safe Senders List
- Step 5 Verify that our contact information is correct and click Ok
Microsoft Outlook 2007
- Step 1 Open the email
- Step 2 Click Options on the Tools menu
- Step 3 On the Preferences tab, under Email, click Junk E-mail
- Step 4 Select Safe Senders or Safe Recipients tab and click add
- Step 5 Enter the email address of the contact and click Ok
Mozilla Thunderbird
- Step 1 Click the Address book button
- Step 2 Make sure the Personal Address Book is highlighted
- Step 3 Click the New Card button
- Step 4 Under the Contact tab, copy and paste our address and click ok
MSN Hotmail (Classic)
- Step 1 Open the email.
- Step 2 Click Save Address in the menu bar.
- Step 3 Verify that our contact information is correct
- Step 3 Click OK on the next screen.
Window Live Hotmail
Adding to the Address Book doesn’t automatically add you to the Safe Sender list; you must mark the sender as Safe.
- Step 1 Open the email
- Step 2 Click on the Mark as Safe link
OR
- Step 1 Log into your account at Outlook.com
- Step 2 Click the gear icon, Options, then Safe and Blocked Senders
- Step 3 Add scoutbook.com and bsa889.com to your safe senders list
Yahoo! Mail
Step 3 Enter the email address of the contact and click on Save Contact.
Step 1 Open the email
Step 2 Select the Add to Address Book link.
How do I deal and identify with dangerous bugs or insects?
Letting a line of ants crawl up your arm might seem kind of cool, unless they happen to be small red ones. Those are fire ants, and they will sting you. Keep your insect interactions interesting instead of painful by knowing how to identify biters and stingers — and then how to deal with bites and stings, just in case.
ANTS

Those fire ants? They live in colonies by the hundreds of thousands, so if you encounter one, you’ll want to get away quickly. They are red or reddish orange and tiny — as small as 1/16-inch long. Fire ants run around and will climb up your body. A sting burns like fire (surprise) and leaves an itchy spot. Some people are allergic and the whole area will get swollen.
TREATMENT: Ice can help with pain, especially if you have lots of stings. If you have a severe reaction or allergy to fire-ant stings, seek medical treatment.
BEES

A regular honeybee can sting you only once. Usually, they are interested in flowers, not humans.Africanized bees are different. They swarm, chase and keep on stinging. Problem is, unless you’re up close with a magnifying glass, you can’t really tell the difference between the two bees.
Jumping in a lake is not the way to escape Africanized bees. They’ll stay around while you’re under water. Best move? Try to get inside a structure: a car, house or even a tent.
TREATMENT: The honeybee leaves its stinger in you. Scrape it out with the hard edge of a credit card or a key to stop it from pumping in more venom. The sooner you get it out, the sooner it will feel better.
Africanized bees can be dangerous because of the number of stings. Treat a few with ice for the pain. If you get stung a lot or you’re allergic, you’ll need medical attention.
FLIES

Horseflies are often found around farms. The females bite to get blood to fertilize and feed eggs. On the good side, they don’t travel in groups. On the bad side, their mouths are like tiny pairs of scissors, so they leave a big mark.

Black flies also bite. They swarm and can get you all over. Unlike a housefly with stripes on the upper part of its body, black flies are plain black. They feed on blood and are often found around water.
TREATMENT: Fly bites can be large and painful. Hydrocortisone cream, ice, calamine lotion and Benadryl can help.
FLYING STINGERS

A hornet nest is large and gray. Hornets regurgitate the wood they chew, making the papery structure. If you mess with the hive, watch out for lots and lots of hornets to attack.
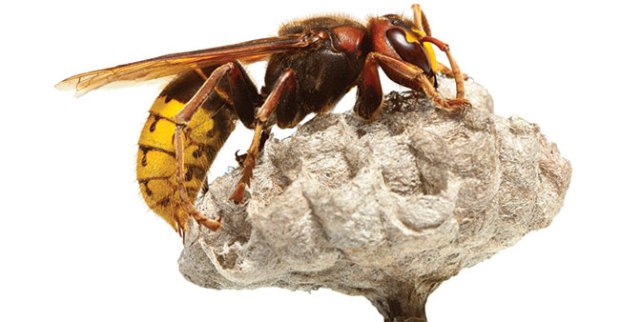
Wasps, on the other hand, are usually loners. They’ll keep stinging you over and over, though.

Yellow jackets are a type of wasp that swarms up from homes in the ground.
A hornet is black and white, while a yellow jacket looks like a skinny bee with a waist. Wasps can be all different colors and usually have two sets of wings.
A hornet’s sting is the most painful and also the most dangerous since you can get lots of stings at the same time if you’ve upset a nest.
Another stinger to avoid: the velvet ant. It is really a wasp, but it looks like an ant with bright red fur. The sting is so painful, its other name is “cow killer.”
TREATMENT: Ice or cold water can numb the stung area. If you have more than a few stings, you should seek medical attention to make sure you don’t have a reaction.
SPIDERS
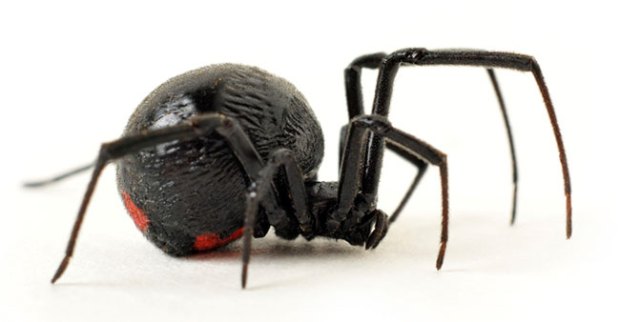
The female black widow is the one that bites. She has a red hourglass on her abdomen and is very shiny black with no hair. Her legs are long and thin compared to her large abdomen.

A brown recluse is a bit hairy, but not as much as a tarantula. Less than an inch in size, it is very fast and pulls back its legs in defense. It’s also known as a fiddleback because the pattern on its back resembles a violin.
There are lots of other spiders, including some that bite, but these are the two to be most concerned about in the U.S. Always shake out shoes or items left outside to make sure no spider is hiding inside.
TREATMENT: See a doctor as soon as possible.
CHIGGERS
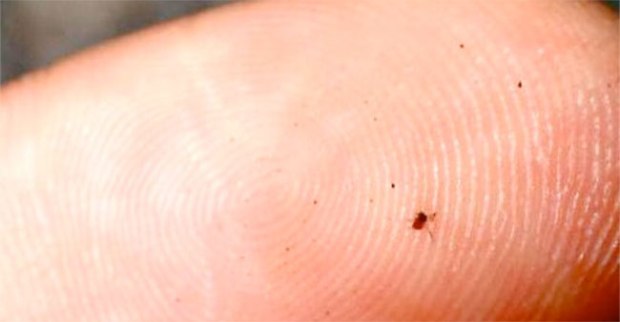
Chiggers are tiny mite larvae that leave toxins under your skin when they bite. This is what makes you itch intensely. Chiggers hang out in the grass, so prevention is your best strategy: Apply insect repellent, wear long pants and sleeves, tuck your pants into your socks, stay on the hiking path and try not to brush up against vegetation. After your hike, take a cool shower and wash your clothes in hot water.
TREATMENT: To stop the itching, try applying ice, hydrocortisone cream or calamine lotion. If it hasn’t resolved in a week or bites become infected, seek medical help. Learn more about treating chigger bites.
FIRST AID TIPS FOR STINGS AND BITES
Let a trusted adult know if you are stung or bitten. If you start to have difficulty breathing or other severe symptoms, get medical help immediately.
Allergies can cause severe reactions to insect bites and stings. Signs of this can include redness, swelling, flushing and hives. Bites can also lead to anaphylactic shock, which is a medical emergency that causes difficulty with breathing. If you have an allergy to stinging/biting insects, be sure to carry your EpiPen (check its expiration date before an outing). Discuss treatments for allergies with your parents and doctor.
Find out more in the Boy Scout Handbook or Fieldbook.
A NOTE ABOUT ICE: Ice should never be applied directly to your skin. Put a layer of fabric (such as a shirt or towel) between your skin and the ice. Apply ice no more than 15 to 20 minutes at a time. Repeat only after 20 to 30 minutes have passed and your skin has returned to normal temperature.
Scoutbook
I’m a parent…what do I need to know?
Scoutbook is an internet-based tool that the troop uses for keeping track of our members’ contact information, training, and advancement progress. We also use it as a communication tool to send messages to each other, publish the troop calendar, and share information via group forums.
Each scout has a profile and advancement record which is maintained by the troop and the national BSA organization. As parents, you can participate by:
The boys’ progress is recognized at a periodic Court of Honor. In order to be included in a Court of Honor, the advancement requirements must be approved (blue checkmarks) and, for Merit Badges, signed blue cards submitted to the Advancement Coordinator
Keeping your personal profile up-to-date (e.g. email address, which is where you will receive most troop communication)
Keeping your scout(s) profile(s) up-to-date. It’s important that each scout’s full name and date of birth matches those in the national BSA system (as submitted on the membership application) so that advancement is properly tracked.
Deciding whether your scout(s) should have his own login to Scoutbook. We recommend this, since it allows the scout to enter his own advancement progress and connect with merit badge counselors, his patrol leader, etc. In order for a scout to login to Scoutbook, the parent must supply the scout’s email address (the troop will not automatically do this). The parent will be automatically copied on any Scoutbook messages that the scout receives.
Entering and monitoring advancement progress. You or your scout can mark off requirements as ‘completed’. While each requirement must be approved by a scout leader before advancement is awarded, Scoutbook can help you keep track of what remains to be done to complete various ranks and merit badges. Requirements you’ve marked as completed have a green checkmark. Uploading notes, pictures, etc can help you get approval for the requirement.
Prior to a Board of Review, your son must have the requirements approved (’signed off’) by a Scoutmaster or assistant scoutmaster. This is referred to as a ’Scoutmaster Conference’ and is similar to having the scout’s paper book signed off. Once approved, the requirements will have a blue checkmark. When all requirements for a rank have been approved, the scout will be awarded the rank, and the requirements will be marked with gold checkmarks.
How do I start a new Merit Badge?
To start a merit badge, the scout (or parent) chooses the merit badge from the list in Scoutbook.
In order to be awarded the badge, you MUST submit a signed ‘blue card’ to the Advancement Coordinator(s), just as you have in the past. Optionally, you can put a blank blue card into your printer and print the card using Scoutbook; however the signed paper card must be turned in.
The Scoutmaster will assign a merit badge counselor who will be responsible for working with your son to accomplish and approve the requirements of the badge. You can optionally ‘connect’ to the merit badge counselor on Scoutbook, which will allow your son to receive messages from the counselor.
As your son progresses through the requirements, mark them as completed and enter any notes, pictures, videos, etc that show the work completed.
When the merit badge is completed, make sure the merit badge counselor has approved all requirements (all blue checkmarks).
My first time in Scoutbook…what do I do?
If you received an invitation via email, use that information to log in to Scoutbook.
You can also sign up for a free Scoutbook account on your own, and you will see our troop on the system. However, if you do this, please contact us because you need to be accepted into the troop’s subscription in order to fully participate.
Once you have logged in, please:
- Verify your profile information (email address, address, etc). Adding a profile picture is optional, but it will help us ‘put a face with the name’ in our rather large troop.
- Verify your scout(s) profile information, and email address if you want them to receive troop email messages.
- Review your son(s) advancement, camping, service, hiking, and award records. Enter any missing information; Tell us if you notice any incorrect information in ranks or merit badge awards.
There is a video introduction to scoutbook that will help you navigate the system.
For additional help with Scoutbook, refer to https://www.scoutbook.com/mobile/help/, or contact us
Adding a new scout (for membership committee)
Refer to this video tutorial
Can I add an extra email address to Scoutbook?
Yes!
Parents are able to add additional connections for their scout(s): for example, another parent, aunt, uncle, or grandparents who are interested in the scout’s progress.
To to this, log into Scoutbook and choose the scout from the ‘My Family’ part of the dashboard. From the scout’s home menu, choose ‘Connections’, and then click ‘Add’.
Camping
How can I minimize impact when camping?
How can I minimize impact while camping
Try to use existing campsites
Camp on durable surfaces and place tents on a non-vegetated area
Do not dig trenches around tents.
Camp a least 200 feet from water, trails, and other campsites.
Leave No Trace
Repackage snacks and food in baggies to reduce weight and trash
For cooking, consider using a camp stove instead of a campfire (camp stoves leave less of an impact on the land)
Observe all fire restrictions:
If you must build a fire,use existing fire rings
Build a mound fire, or use a fire pan
Use only fallen timber for campfires
Do not cut standing trees
Clear a 10-foot diameter area around the site by removing any grass, twigs, leaves and extra firewood
Make sure there aren’t any tree limbs or flammable objects hanging overhead.
Allow the wood to burn down to a fine ash, if possible
Pour water on the fire and drown all embers until the hissing sound stops
Stir the campfire ashes and embers until everything is wet and cold to the touch. If you don’t have water, use dirt
Washing/Bathing Techniques:
Wash 200 feet away from streams and lakes (detergents, toothpaste and soap harm fish and other aquatic life.
Scatter gray water so it filters through the soil.
In areas without toilets, use a portable latrine if possible, and pack out your waste. (bury waste if not available)
Human waste should be disposed of in a shallow hole six to eight inches deep at least 200 feet from water sources, campsites, or trails
Cover and disguise the hole with natural materials (recommended to pack out your toilet paper)
High use areas may have other restrictions, so check with a land manager.
Following a trip, wash your gear and support vehicle to reduce the spread of invasive species.
How do I set up a tent?
Here are a few tips for when you’re ready to pitch your tent:
- At the campsite, choose a level spot that drains well.
- Remove stones and sticks, but don’t disturb the natural ground cover.
- Always look for signs of creepy critters.
- Spread out your tent’s footprint, or a ground cloth, to protect the tent floor from moisture, sharp objects and dirt.
- Unfold the tent on top of the footprint. Pull out the corners of the floor and stake them to the ground, then assemble the poles and put them in place.
- Use taut line hitches to tie the free ends of guylines around stakes you’ve pushed into the ground, and pull the lines tight.
- Put a rain fly over the tent, and stake it down.
After camping, remember to air out your tent before packing it away. Ensuring it is dry will prevent mildew.
How do I build a safe and secure fire?
 fire-place
Clear the area of debris, avoid overhanging branches and make sure your fire is a safe distance from tents and other flammable materials. One option is to build your fire on an earthen pad like this one, but make sure to do it in a way that leaves no trace when you’re done.

The three types of natural fuel are tinder (material that burns easily such as dry grass or shavings whittled from a stick), kindling (slightly larger material such as twigs that will burn with a little encouragement) and firewood (dry branches that will be the main fuel of the fire). No shortcuts allowed — never use flammable liquids.
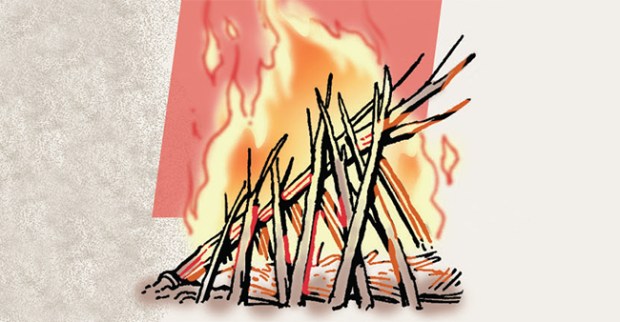
Two ways to build your fire are the tepee, in which you arrange the kindling in the shape of a tepee over the tinder, and the lean-to, in which you push a small stick in the ground at a 45-degree angle with the upper end pointing into the wind. Place the tinder beneath the stick and lean the kindling against it. Light the tinder and add kindling as needed. Add the larger branched last. Never leave a fire unattended.

Pour water on the fire, stir the ashes with a stick, pour some more. It’s not out until you can run your bare hands through the coals.